Fatigue criteria
Fatigue is a progressive structural damage of materials under cyclic loads. Most of engineering failures are caused by Fatigue that is why it is very important to perform a Fatigue Check. SDC Verifier implement two methods of Fatigue Check:
- the stress difference method
- the stress difference method with mean stress correction (Smith Correction)
The first method only takes into account the stress range (the difference between the maximum and minimum stress). Codes or standards as the Eurocode 3, the EN13001 crane code or the recommendations for fatigue design of welded joints and components of the IIW (the International Institute of Welding), see for example IIW document XIII-1965-03 / XV-1127-03 for both Steel and Aluminum.
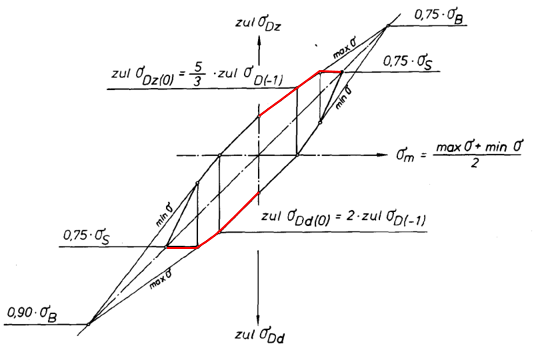
The second method takes the influence of the mean stress into account according to Smith, see the figure below:
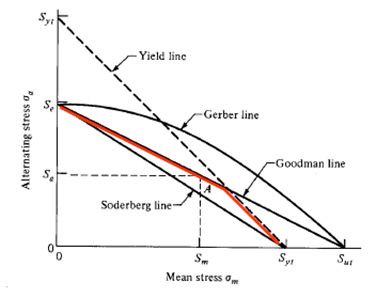
Most of the crane standards as the DIN 15018, FEM 1.001, NEN 2018/ NEN 2019, DASt richtlinie and the FKM use the Smith correction (combination of goodman and yield correction, the red line in the graph above). The implementation of the DIN 15018 standard is used as an example to explain this method.
Translation of the Smith correction into allowable stresses
In contrast with other fatigue calculation methods, no fatigue damage is calculated, but an allowable fatigue stress is used which depends on the usage (=number of load cycles and the intensity of the load translated in a load spectrum). Instead of using a fixed allowable alternating stress, the Smith correction results in lower allowable stress variation with increasing mean stresses. In crane codes instead of using mean stress and alternating stress, the minimum and maximum stress values are used, see below:
The alternating stress is:
\[\sigma _{alt} \ =\ \sigma _{max} -\sigma _{min}\]
and the mean stress is:
\[\sigma _{mean} \ =\ (\sigma _{max} -\sigma _{min})/2\]
The limit stress ratio defines the maximum allowable stress and is calculated as:
\[\kappa =\sigma _{min} /\sigma _{max} \ \] if \[|\sigma _{max} | >|\sigma _{min} |\]
and
\[\kappa =\sigma _{max} /\sigma _{min} \ \] if \[|\sigma _{min} | >|\sigma _{max} |\]
and therefor:
-1 < κ < 1
The resulting allowable stress range is shown in the figure below with the limitation for tension and compression stress in red:
In the table below this is translated into allowable stress formula for 1 stress direction:
Table 18. Equations relating to the permissible maximum stresses according to figure 9 as a function of x and zul σD(-1) as specified in table 17
| Alternating stress range 1< x < 0 |
Tension | \[zul\sigma _{D_{z}( x)} =\ \frac{5}{3-2x} \cdot zul\sigma _{ D( -1)}\] |
| Compression | \[zul\sigma _{D_{d}( x)} =\ \frac{2}{1-x} \cdot zul\sigma _{ D( -1)}\] | |
| Pulsating stress range 0 < x < +1 |
Tension | \[zul\sigma _{D_{z}( x)} =\ \frac{zul\sigma _{D_{z}( 0)}}{1-\left( 1-\frac{zul\sigma _{D_{z}( 0)}}{0,75\cdot \sigma _{B}}\right) \cdot x}\] |
| Compression | \[zul\sigma _{D_{d}( x)} =\ \frac{zul\sigma _{D_{d}( 0)}}{1-\left( 1-\frac{zul\sigma _{D_{d}( 0)}}{0,90\cdot \sigma _{B}}\right) \cdot x}\] |
This check is repeated for all stress directions. For a combination check DIN 15018 uses the formula below:
\[(\frac{\sigma_{x}}{zul\sigma_{xD}})^2+(\frac{\sigma_{y}}{zul\sigma_{yD}})^2-(\frac{\sigma_{x}\cdot\sigma_{y}}{|zul\sigma_{xD}|\cdot|zul\sigma_{yD}|})+(\frac{\tau}{zul\tau_{D}})^2 \le 1,1\]
where
σx, σy is the calculated normal stress in x and y directions;
| is the permissible normal stress corresponding to stresses σx and σyrespectively; |
| is the amount of zul σxD and σyD respectively; |
| τ | is the calculated shear stress: |
| zul τb | is the permissible shear stress corresponding to the stress calculated shear stress τ |
Also, the following material constants are used:
σB is the ultimate material stress
σS is the yield material stress
With this method the allowable fatigue stress σD(κ)for each stress direction depends on:
- Material type (Yield and Ultimate stress levels);
- Number of load cycles and load spectrum in an element Group (B1-B6);
- Weld or notch group (W0-W2 for unwelded material and K0-K4 for welded designs);
- The κ-factor (the ratio between the maximum and the minimum stress);
- The sign of the stress (tension or compression).
Implementation in SDC Verifier
The allowable fatigue stress according to the smith correction method depends according to crane codes as the Din 15018 on the following items:
- Number of load cycles in an element Group (B1-B6);
- Material type (Yield and Ultimate stress levels);
- Weld or notch group (W0-W2 for unwelded material and K0-K4 for welded designs).
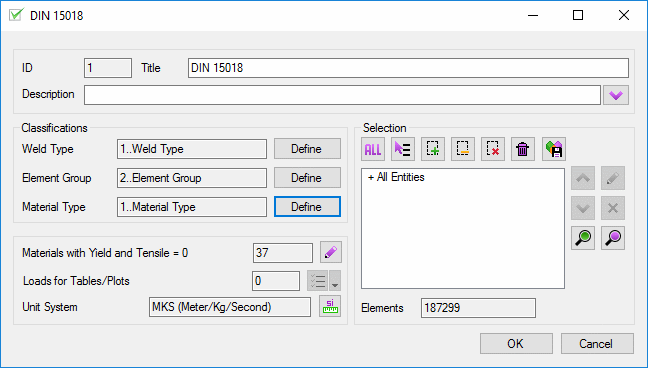
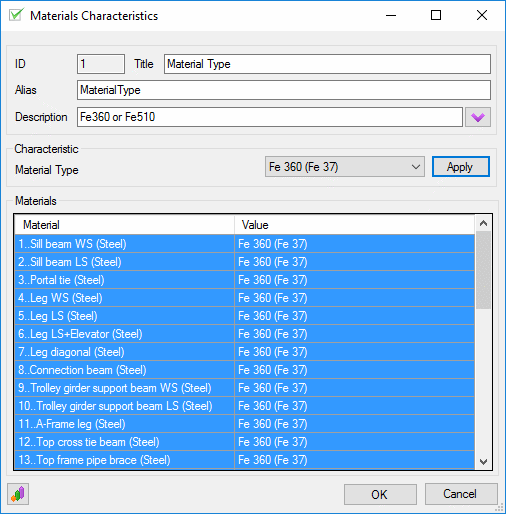
SDC Verifier defines this for the DIN 15018 with the start window below:
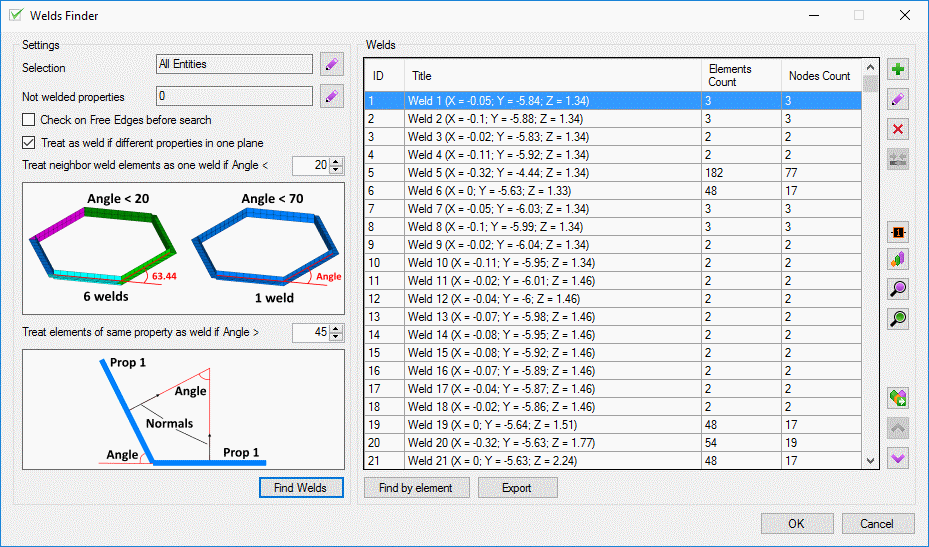
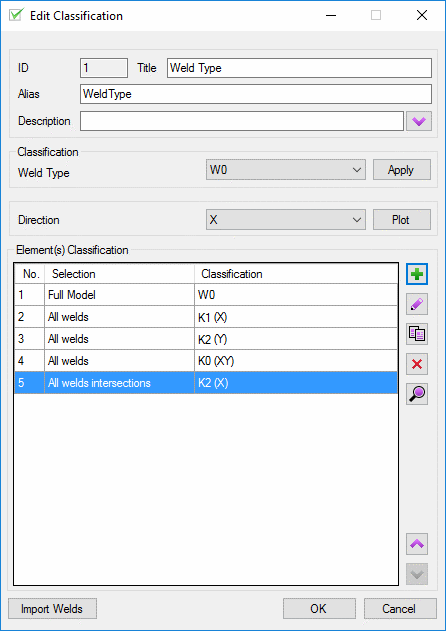
For the DIN 15018 standard classifications has to be set. Manually select elements which belong to welds. With the selection tools and/or the help of Weld Finder tool it is possible to quickly set all classifications.
Number of load cycles → Element group
The Element Group or Loading Group depends on Load Spectrum (S0-S3) and Class of Utilization (N1-N4):
The Load Spectrum and number of load cycles are shown in the next tables:
Class of Utilization
Material properties
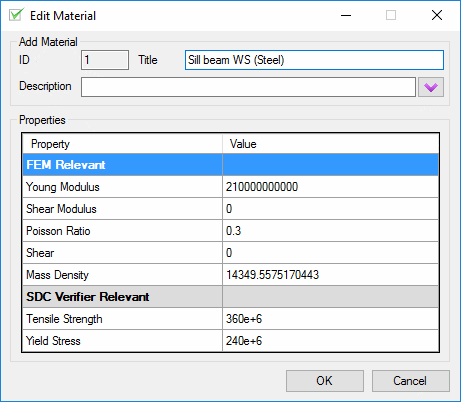
The yield and tensile stress of the material need to be filled for each material for example in the window below (in the SDC Verifier relevant material properties):
Notch group Classification tools
The DIN 15018 comes uses 2 material tables, St37 which is equal to Fe360 or S235) and St52-3 which is similar to Fe510 or S355. Each element can be assigned to 1 of the 2 material tables with the window below:
For the fatigue resistance the DIN 15018 uses weld or notch groups where W0-W2 are classes for unwelded material and K0-K4 are for welded designs).
The table 17 of the DIN 15018 shows the influence of the material type, the crane group and the notch group on the maximum allowable stress amplitude for pure dynamic loads (minimum stress = – maximum stress and stress ratio κ =-1)
Basic values of the allowable stresses for fatigue σD(-1), in N/mm² for x=-1 in members for the verification of service strength.
| Steel Grade | St 37 | |||||||
|---|---|---|---|---|---|---|---|---|
| Notch group | W0 | W1 | W2 | K0 | K1 | K2 | K3 | K4 |
| Loading group | Permissible stresses zulσD(-1) for x=-1 | |||||||
| 1 | 180 | 180 | 180 | 180 | 180 | 180 | 180 | (152.7) |
| 2 | (168) | (180) | 108 | |||||
| 3 | (161.4) | 141.3 | (178.2) | 127.3 | 76.1 | |||
| 4 | (169.7) | 135.8 | 118.8 | (168) | (150) | 126 | 90 | 54 |
| 5 | 142.7 | 114.2 | 99.9 | 118.8 | 106.1 | 89.1 | 63.6 | 38.2 |
| 6 | 120 | 96 | 84 | 84 | 75 | 63 | 45 | 27 |
| Steel Grade | St 52-3 | |||||||
|---|---|---|---|---|---|---|---|---|
| Notch group | W0 | W1 | W2 | K0 | K1 | K2 | K3 | K4 |
| Loading group | Permissible stresses zulσD(-1) for x=-1 | |||||||
| 1 | 270 | 270 | (247.2) | 270 | 270 | 270 | (254) | (152.7) |
| 2 | (249) | 199.2 | (252) | 180 | 108 | |||
| 3 | (152.2) | 200.6 | 160.5 | (237.6) | (212.1) | 178.2 | 127.3 | 76.1 |
| 4 | 203.2 | 161.7 | 129.3 | 168 | 150 | 126 | 90 | 54 |
| 5 | 163.8 | 130.3 | 104.2 | 118.8 | 106.1 | 89.1 | 63.6 | 38.2 |
| 6 | 132 | 105 | 84 | 84 | 75 | 63 | 45 | 27 |
The step ratio between the stresses of two consecutive loading groups is 1.1892 for St 37 and 1.2409 for St52.3, for notch cases, W0 to W2; or notch cases K0 to K4, the step ratio is 1.4142 for St37 and St 52-3.
According to this table the maximum alternating stress amplitude, for example, an element with Material Type = St37, Weld Type = K2 and Element Group = B5 = 89.1 MPa.
For non-pure alternating stress, the relations from table 17 of the DIN 15018 is used.
Notch group classification in crane codes as the DIN 15018
The notch factor library tries to combine information of:
- — the weld quality*
- — the stress concentration factor
*non-welded sections are combined in the special notch groups W0, W1, and W2.
This same weld atlas is also used also for other standards as the F.E.M. 1.001, NEN 2018/ NEN 2019, DASt richtlinie.
Influence of weld quality
The influence of the weld quality can be best seen by the perpendicular stressed weld type. For a non-welded plate notch-group W0 is used and for welds weld qualities K0 to K4 are applicable. The weld is classified by a 3 digit number (see red encircled number below), the first digit represents the weld group 0-4 for K0 to K4, the second the stress orientation and the third a geometric type number. A good quality weld has a low notch group K0 and the notch group number increases with a decreasing fatigue resistance.
No weld no holes W0
| N0. | Description | Symbol | |
|---|---|---|---|
| W01 | Part without a hole and joint, with a normal state of the surface, without notch behavior. |  |
 |
Slight notch behavior group K0
| N0. | Description | Symbol | |
|---|---|---|---|
| 011 | Parts, joined by a butt weld of special quantity, perpendicular to the direction of force. |  |
 |
Moderate notch behavior group K1
| N0. | Description | Symbol | |
|---|---|---|---|
| 111 | Parts, joined by a butt weld of ordinary quantity, perpendicular to the direction of force. |  |
 |
Medium notch behavior group K2
| N0. | Description | Symbol | |
|---|---|---|---|
| 211 | Parts, joined by a butt weld of special quantity, perpendicular to the direction of force. |  |
 |
Great notch behavior group K3
| N0. | Description | Symbol | |
|---|---|---|---|
| 311 | Parts, joined by a butt weld with a backing strap, without sealing run and perpendicular to the direction of force. Backing strap fixed by track welding. |  |
 |
and a different connection type 351
| N0. | Description | Symbol | |
|---|---|---|---|
| 351 | Double bevel weld of ordinary quantity, perpendicular to the direction of force, between crossing parts. |  |
 |
Very great notch behavior group K4
| N0. | Description | Symbol | |
|---|---|---|---|
| 412 | Parts of different thickness, joined by a butt weld of ordinary quantity, perpendicular to the direction of force. Asymmetrical joint without slope. |  |
 |
and a different connection type 451
| N0. | Description | Symbol | |
|---|---|---|---|
| 451 | Fillet welds of normal quantity or single bevel weld (included fillet weld) with backing, perpendicular to the direction of force, between crossing parts. |  |
 |
Influence of stress concentrations
The influence of stress concentrations can be seen in the following perpendicular loaded weld in the plate-plate connection types. If a detailed model is used the influence of already modeled stress concentration factors should be avoided.
Slight notch behavior group K0
| N0. | Description | Symbol | |
|---|---|---|---|
| 013 | Gusset, jointed by out welds of special quantity, perpendicular to the direction of force. |  |
 |
Moderate notch behavior group K1
| N0. | Description | Symbol | |
|---|---|---|---|
| 113 | Gusset, jointed by butt welds of ordinary quantity, perpendicular to the direction of force. |  |
 |
Medium notch behavior group K2
| N0. | Description | Symbol | |
|---|---|---|---|
| 213 | Butt weld of special quantity and continuous part, both perpendicular to the direction of force, at a crossing of flanges with in-weld corner plates. The ends of the welds are ground to prevent them from notch behavior. |  |
 |
Great notch behavior group K3
| N0. | Description | Symbol | |
|---|---|---|---|
| 313 | Butt weld of ordinary quantity and continuous part, both perpendicular to the direction of force, at a crossing of flanges with in-weld corner plates. The ends of the welds have been ground to prevent them from notch behavior. |  |
 |
Very great notch behavior group K4
| N0. | Description | Symbol | |
|---|---|---|---|
| 413 | Butt weld of ordinary quantity, perpendicular to the direction of force, at a crossing of flanges without corner plates. |  |
 |
Determination of a Notch Case or Weld type
The Notch case– also called Weld Type, can be set to K0-K4 – for different welding types, or W0-W2 – for elements without welds. The weld Type depends on the shape, structural design, whole pattern or type and quality of welds.
With SDC Verifier the specification of the notch case throughout the model is very straightforward. With the weld finder, all welds in a FEM model are found automatically and the element x-orientation can be set parallel to the weld direction (the y-direction is then always perpendicular to the weld).
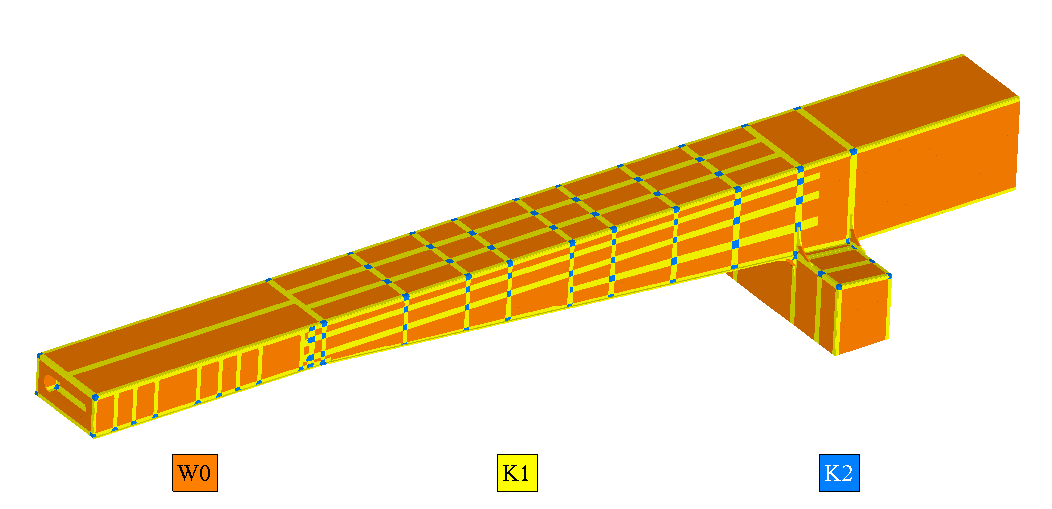
With the selection tools, it becomes very easy to set the different notch classes for the locations without weld, with weld (perpendicular K2 and parallel K1 to the weld) and for the intersections K2 in X direction.
Fatigue check results
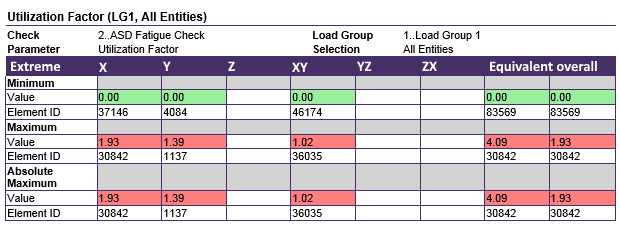
When all classifications are defined and loads are combined into Load Groups Fatigue Check can be performed. The fatigue Utilization Factor (Stress / Fatigue Allowable Stress) can be calculated for each different direction (X Y and Z are normal stresses and XY, YZ and ZX the shear stresses). The equivalent direction shows the combined result according to the combination rule as in the formula below:
As in the example below the result of the combination, the rule is not always the highest factor (The sqrt (4.09)/1.1=1.84 which is lower than the maximum fatigue check in x direction 1.93). The maximum result of the 7 checks is shown in the Overall row. In the overall row, the maximum of all single checks and the square root of the equivalent check/1.1 is calculated. In this way, all 7 checks need to be below 1. Therefore the best way to get an immediate answer on all fatigue checks at once is by plotting the overall fatigue result.
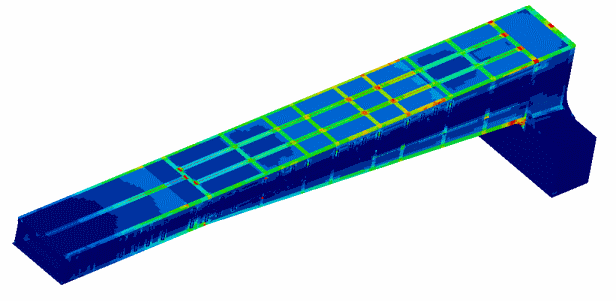
The calculation procedure is repeated for all elements and each point of interest. By plotting the overall fatigue check (all other directions can also be plotted of course) the result of the complete check is shown:


